Create a Section
Contents
- 1 Add a Section (Instructor-Led Courses Only)
- 1.1 Step 1
- 1.1.1 Section # and Title
- 1.1.2 Location
- 1.1.3 Attendance
- 1.1.4 Maximum Number of Participants
- 1.1.5 Allow Waitlist
- 1.1.6 Maximum Waitlist Size
- 1.1.7 Section Start and End Date
- 1.1.8 End of Registration
- 1.1.9 Waitlist Cutoff Date
- 1.1.10 Classtime Default (Start Time) and (End Time)
- 1.1.11 Release Section Now
- 1.1.12 Archived
- 1.1.13 Or Release Section At
- 1.1.14 Contact Person/Instructors
- 1.1.15 What materials do participants need to bring to a session? (i.e. site links, laptops, books)
- 1.1.16 Notes
- 1.1.17 File Attachments
- 1.2 Step 2
- 1.1 Step 1
Add a Section (Instructor-Led Courses Only)
Every instructor-led course is required to have at least one section. (Participants enroll in a section.) You should set class times for every section that you create.
Add a Section (Instructor-Led Courses Only)
Every instructor-led course is required to have at least one section. (Participants enroll in a section.) You should set class times for every section that you create.
Step 1
Scroll to the bottom of the screen and click on New Section.

Section # and Title
Enter the section Title.

Location
Enter the location and/or Room Number of where the PD will be held. If you are reserving a room at a specific location you will need to secure confirmation that you can use the facility.
By completing the Street Address, City, State, and Zip a map will appear on the section page allowing the visitor to get directions to you PD's location.

Attendance
Select how the attendance will be taken. Once as day or Twice a day. This is valuable if you have a section that will extend through a lunch brake and need to retake attendance.

Maximum Number of Participants
Enter the Maximum Number of Participants that will be allowed to attend. This number MUST be based on the size of the facility you have reserved

Allow Waitlist
Check this option if you would like to Allow a Waitlist.
![]()
Maximum Waitlist Size
If you allow a waitlist enter the maxim size you are willing to accept.

Section Start and End Date
Enter the start and end dates of your session.

End of Registration
Enter the start and end dates of your session.
Waitlist Cutoff Date
Enter the date that you wish to stop taking names for the wait list.

Classtime Default (Start Time) and (End Time)
Enter the start and end times of your PD..

Release Section Now
This check box gives you the option to release the section now. You will notice that when you click the Create button this box will remain unchecked. This option will be unavailable until the section is approved by the Final Approver.

Archived
Once the section has been completed and closed out this box MUST be checked to remove the section from the Catalog.

Or Release Section At
If you would like to release a section on a specific date enter the time of release and the date..

Contact Person/Instructors
The Contact Person/Instructors is a REQUIRED field. This field will be marked as -Not Set- by default.
When completing the form you can skip this step for now. You will add the Instructor on in the process see the Instructors section in Step 2

What materials do participants need to bring to a session? (i.e. site links, laptops, books)
If there are any materials that need to be brought to the session, list them here.

Notes
Any specific information that the participants need to be aware of can be added in the Notes field.

File Attachments
Any document, pre-work,etc. can be added using the File Attachments field. Note that the file size can not exceed 20MB.

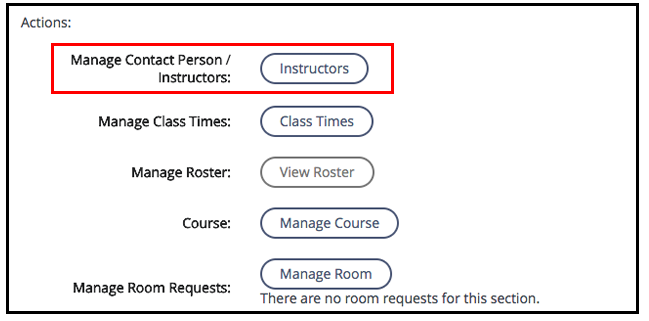
Step 2
Instructors
- Once the page refreshes scroll to the bottom of the page and you will be presented with a new Actions section. Click on the Instructors button.
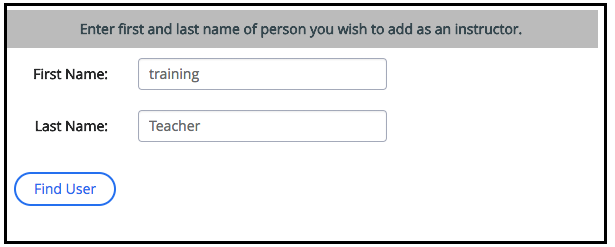
- Search for an instructor by first or last name. Then click Find User.
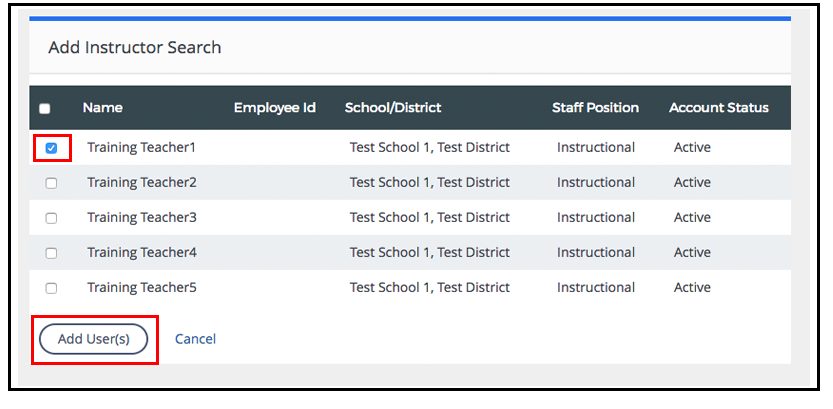
- Once you see the name of the instructor, check the applicable box, then click Add User(s).
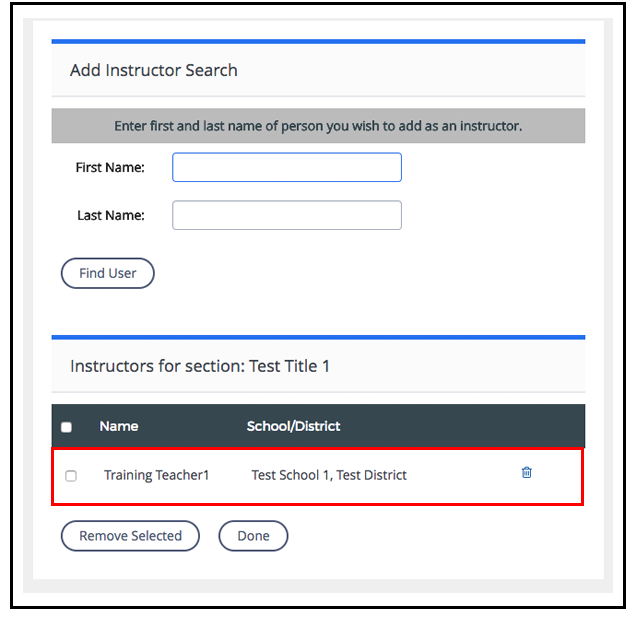
- Once the instructor is added, you will see it in the instructors list. Click Done.


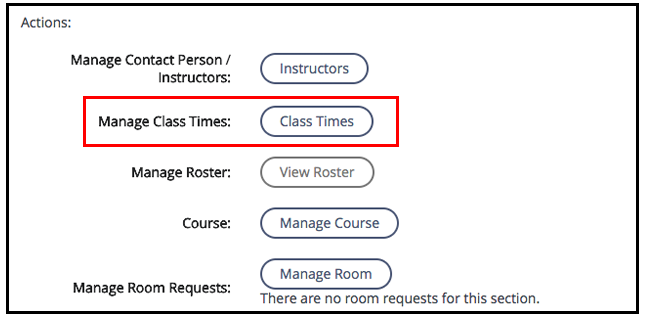
Class Times
After the page refreshes you will notice that the Class Times filed indicates No Class Times Set in red.

Once the page refreshes scroll to the bottom of the page and you will be presented with a new Actions section.
- To set specific meeting times for your section, click the Class Times button.
- To set a new time, click Add A New Class Time.
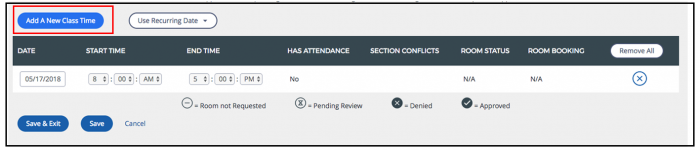
- The date will default to the Start Date you entered on the section form. Adjust as needed.
- The times will default to the Start Time and End Time entered on the section form. Adjust as needed.
- To add another day, repeat the above steps.
- When finished, click Save & Exit

