Difference between revisions of "Access your Course"
| Line 3: | Line 3: | ||
<li>Click '''Administration''' in the tabs along the top of the screen.</li> | <li>Click '''Administration''' in the tabs along the top of the screen.</li> | ||
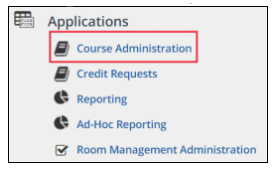
<li>In the Applications menu, click '''Course Administration'''.<br> | <li>In the Applications menu, click '''Course Administration'''.<br> | ||
| − | [[ | + | [[File:Courseadmin.png ]] |
| + | |||
</li> | </li> | ||
| Line 13: | Line 14: | ||
</ul> | </ul> | ||
</li> | </li> | ||
| − | <li>Click the title of the course you want to manage.</li> | + | <li>Click the title of the course you want to manage.<br> |
| + | [[File:Clicktitle.png]]</li> | ||
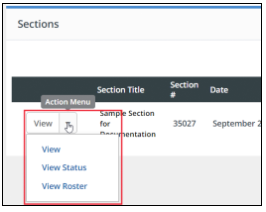
| − | <li>Scroll to '''Sections''' at the bottom of the page. Click the action menu to view the tools available to you for a section. Click '''View Roster'''.</li> | + | <li>Scroll to '''Sections''' at the bottom of the page. Click the action menu to view the tools available to you for a section. Click '''View Roster'''.<br> |
| + | [[File:Sections.png]]</li> | ||
</ol> | </ol> | ||
Revision as of 20:30, 30 May 2018
- Click Administration in the tabs along the top of the screen.
- In the Applications menu, click Course Administration.
- On the Search Learning Opportunities screen:
- To locate a specific course, enter applicable search criteria, then click Search.
-OR- - To display all courses for which you have been identified as an instructor or moderator, click List All. (If you are an Office Administrator, the list displays all courses within your office.)
- To locate a specific course, enter applicable search criteria, then click Search.
- Click the title of the course you want to manage.

- Scroll to Sections at the bottom of the page. Click the action menu to view the tools available to you for a section. Click View Roster.